Run Jetty Web Server Within Your Application
Contents
- Introduction
- Download Jetty
- Create an Eclipse project
- Create a web application
- Create a Jetty server instance
- Create a user interface to start and stop server
- Create a main method
- Run the application
- Conclusion
Introduction
The purpose of this article is to give you a quick idea of how to build and deploy your web application without really running a web server outside your application and without creating a WAR file for the deployment. At present, I am working on a project which is a background calculation engine and it provides a simple web interface for the support and business users to monitor the ongoing activities. While deploying our application, we just start Jetty web server within our application and we can access the web application easily.
If you visit the Jetty wiki, it is mentioned that Jetty has a slogan, "Don't deploy your application in Jetty, deploy Jetty in your application." In this article, we illustrate this slogan in a nice and simple application.
Download Jetty
Before we can start creating our project, we need to download any stable version of Jetty JARs from Jetty@eclipse downloads site. In this article, I have used Jetty 7. The per Jetty site comes with following bundle.
- Core Jetty Web Server (HTTP & Websocket)
- Core Jetty Servlet Container
- JNDI, JMX, OSGi, JASPI modules
- HTTP Client
Apart from Jetty JAR, we need to have JSK 1.6 and Eclipse 3.5 installed on our system. Once these three things are ready, then we are good to create our application.
Create an Eclipse Project
You just need to follow the below mentioned steps to create a Java project in Eclipse.
- Go to Eclipse's File menu and create a Java project.
- Keep the default JRE option if it is selected as JavaSE-1.6.
- Click the Library tab and select the Jetty Jar files.
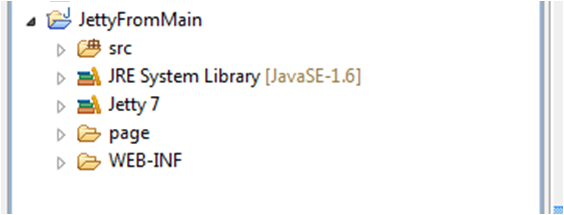
- Once the project has been created, add two more folders in your project "page" and "WEB-INF".
Once we are done with the creation of project, the project structure should look like the following diagram:
As our project is now setup, we are ready to create our web application which is going to be launched within our application.
Create a Web Application
- Create a deployment descriptor (i.e. web.xml) in WEB-INF folder. This is a very basic descriptor only welcome file name is mentioned within it.
 <?xml version="1.0" encoding="UTF-8"?>
<web-app version="2.4"
xmlns="http://java.sun.com/xml/ns/j2ee"
xmlns="http://java.sun.com/xml/ns/j2ee"
xsi:schemaLocation="http://java.sun.com/xml/ns/j2ee
http://java.sun.com/xml/ns/j2ee/web-app_2_4.xsd">
	<welcome-file-list>
		<welcome-file>page/index.jsp</welcome-file>
	</welcome-file-list>
</web-app>
- Next we need to create an index.jsp page within page folder, which is going to be displayed when we hit the URL in our web browser.
<%@ page language="java" contentType="text/html;
charset=ISO-8859-1 pageEncoding="ISO-8859-1"%>
<!DOCTYPE html PUBLIC "-//W3C//DTD HTML 4.01 Transitional//EN"
	"http://www.w3.org/TR/html4/loose.dtd">
<html>
	<head>
		<meta http-equiv="Content-Type"
			content="text/html; charset=ISO-8859-1">
		<title>Embedding Jettye</title>
	</head>
	<body>
		<h2>Running Jetty web server from our application!!</h2>
	</body>
</html>
Create a Jetty Server Instance
- First, we build a
WebAppContextin which we can define location of our deployment descriptor and set the application context path. ThisWebAppContextrequired to set the header of Jetty server which will be illustrated in a later part of this section. The following code describes how to buildWebAppContext.package blog.runjetty.context; import org.eclipse.jetty.webapp.WebAppContext; public class AppContextBuilder { private WebAppContext webAppContext; public WebAppContext buildWebAppContext(){ webAppContext = new WebAppContext(); webAppContext.setDescriptor(webAppContext + "/WEB-INF/web.xml"); webAppContext.setResourceBase("."); webAppContext.setContextPath("/runJetty"); return webAppContext; } }
- Once we created WebAppContext; we create a class which is responsible to manipulate
org.eclipse.jetty.server.Serverclass's instance. For this, I have built a wrapperJettyServer. It defines the running post (default 8585), sets context header (i.e. setting the WebAppContext), starts/stops the server and checks whether the server is running or not.package blog.runjetty.server; import org.eclipse.jetty.server.Server; import org.eclipse.jetty.server.handler.ContextHandlerCollection; public class JettyServer { private Server server; public JettyServer() { this(8585); } public JettyServer(Integer runningPort) { server = new Server(runningPort); } public void setHandler(ContextHandlerCollection contexts) { server.setHandler(contexts); } public void start() throws Exception { server.start(); } public void stop() throws Exception { server.stop(); server.join(); } public boolean isStarted() { return server.isStarted(); } public boolean isStopped() { return server.isStopped(); } }
Create a User Interface to Start and Stop Server
Now we are going to build a simple swing based user interface which has a start/stop button. Depending on the server status, it either starts the server or turns it off.- Create an
ActionListenerwhich actually checks the current status of the server and toggles its state whenever any action is performed. In our application, we have createdServerStartStopActionListnerwhichimplements ActionListener interfaceandoverrides actionPerformedmethod.package blog.runjetty.ui.listener; import java.awt.Cursor; import java.awt.event.ActionEvent; import java.awt.event.ActionListener; import javax.swing.JButton; import blog.runjetty.server.JettyServer; public class ServerStartStopActionListner implements ActionListener { private final JettyServer jettyServer; public ServerStartStopActionListner(JettyServer jettyServer) { this.jettyServer = jettyServer; } @Override public void actionPerformed(ActionEvent actionEvent) { JButton btnStartStop = (JButton) actionEvent.getSource(); if(jettyServer.isStarted()){ btnStartStop.setText("Stopping..."); btnStartStop.setCursor(new Cursor(Cursor.WAIT_CURSOR)); try { jettyServer.stop(); } catch (Exception exception) { exception.printStackTrace(); } btnStartStop.setText("Start"); btnStartStop.setCursor (new Cursor(Cursor.DEFAULT_CURSOR)); } else if(jettyServer.isStopped()){ btnStartStop.setText("Starting..."); btnStartStop.setCursor(new Cursor(Cursor.WAIT_CURSOR)); try { jettyServer.start(); } catch (Exception exception) { exception.printStackTrace(); } btnStartStop.setText("Stop"); btnStartStop.setCursor (new Cursor(Cursor.DEFAULT_CURSOR)); } } }
- Once the
ActionListenerhas been created, we need to create aJFrame. OurServerRunnerclassextends JFrame. It has aJButton, which has been registered toServerStartStopActionListnerto perform start or stop oparation when clicked.package blog.runjetty.ui; import java.awt.BorderLayout; import javax.swing.JButton; import javax.swing.JFrame; import blog.runjetty.server.JettyServer; import blog.runjetty.ui.listener.ServerStartStopActionListner; public class ServerRunner extends JFrame{ private static final long serialVersionUID = 8261022096695034L; private JButton btnStartStop; public ServerRunner(final JettyServer jettyServer) { super("Start/Stop Server"); setDefaultCloseOperation(EXIT_ON_CLOSE); btnStartStop = new JButton("Start"); btnStartStop.addActionListener (new ServerStartStopActionListner(jettyServer)); add(btnStartStop,BorderLayout.CENTER); setSize(300,300); Runtime.getRuntime().addShutdownHook(new Thread(new Runnable() { @Override public void run() { if(jettyServer.isStarted()) { try { jettyServer.stop(); } catch (Exception exception) { exception.printStackTrace(); } } } },"Stop Jetty Hook")); setVisible(true); } }
- In
ServerRunner, I have added aShutdownHook. So, whenever the user clicks on the close button on the top right corner of the window, it will first check whether the server is running or not. If running, it will stop the server before exiting.
Create a Main Method
Now once everything is ready, we are good to create amain method which triggers the user interface. The following code shows how to launch the interface.
package blog.runjetty.main;

import java.awt.EventQueue;

import org.eclipse.jetty.server.Handler;
import org.eclipse.jetty.server.handler.ContextHandlerCollection;

import blog.runjetty.context.AppContextBuilder;
import blog.runjetty.server.JettyServer;
import blog.runjetty.ui.ServerRunner;

public class JettyFromMain {

	public static void main(String[] args) {
		ContextHandlerCollection contexts = new ContextHandlerCollection();

		contexts.setHandlers(new Handler[]
			{ new AppContextBuilder().buildWebAppContext()});

		final JettyServer jettyServer = new JettyServer();
		jettyServer.setHandler(contexts);
		Runnable runner = new Runnable() {
			@Override
			public void run() {
				new ServerRunner(jettyServer);
			}
		};
		EventQueue.invokeLater(runner);
	}
}
Here you can find that I am fist creating ContextHandlerCollection and adding our WebAppContext and later setting the handler into our server. In the run() method, I am creating an instance of ServerRunner. After the following implementation, our project structure should look like the following diagram:

Run the Application
It's time now to test our application. Perform the following actions step by step to run the application and find out for yourself how it works.
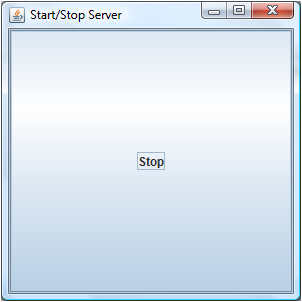
- Run the application from Eclipse.
- You should see the following window:

- Click on Start button. Wait until the text of the button changes to Stop as mentioned in the diagram below:
- Open a web browser and hit the URL as http://localhost:8585/runJetty/.
Your web application should be up and running as demonstrated in the figure below: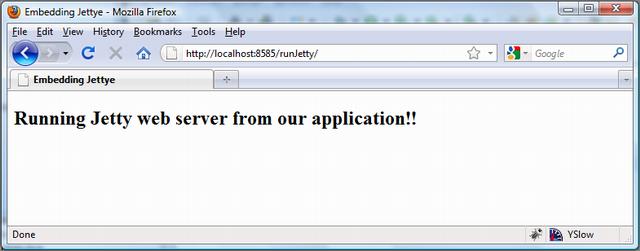
- Now, click the Stop button or close the window directly.
- If you click on the Stop button, wait for text appears as Start. Then refresh your browser window to verify that your web application is not running anymore as shown below:

Conclusion
As you have seen, it is easy to build and deploy Jetty server in our application. Now you are ready to explore on your own, like creating a SSL connection with just a few lines of codes, build a more complex web application using Spring MVC or any other Java web technology. For more information, please visit the official Jetty web site: http://www.eclipse.org/jetty/ or feel free to post your comments here. Any suggestions or advice is always welcome!