Magnifying Effect in WPF
Intoduction
The purpose of this article is to give you an idea on how you can go about creating a magnification effect in your WPF applications. The concepts you'll pick up will hopefully be of use in a full fledged application that would require such functionality. I will also explain how you can go about using my Magnifier control, a UserControl that functions like an Image control with a magnification region.
Requirements
To run the project provided from the download link above you require either of the following,
- Visual Studio 2010
- Expression blend
If you have Visual Studio 2008 you can download the source files from here.
NB: If you're using the express edition of Visual Studio, ensure that you open the solution using Visual Basic Express.
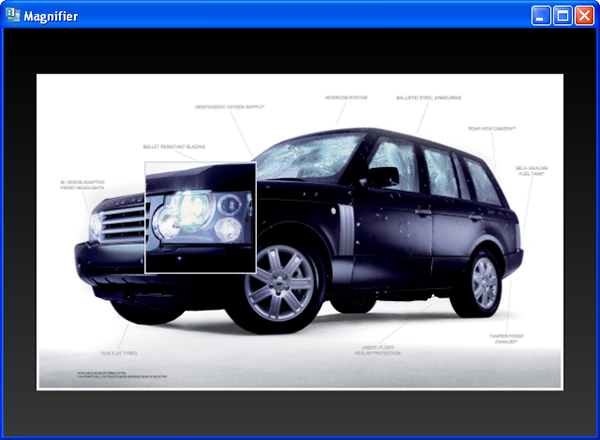
Magnifier (The demo)
How it Works
Move the mouse pointer over the image. A magnification region will show up. Move your mouse to move the magnification region around the image. (If you start feeling concerned I urge you not to worry. You should see the other guy's car.)
Design and Layout
I put everything together in Expression Blend. The following image shows how elements are laid out in the Objects and Timeline panel,
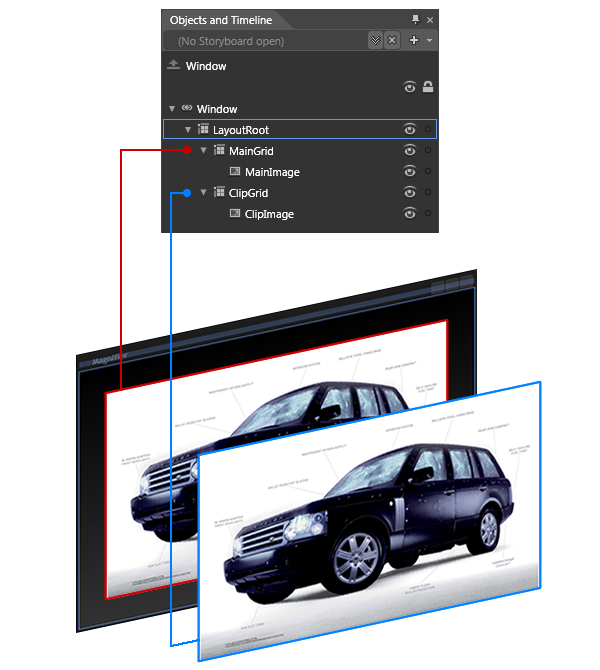
The elements of interest here are MainGrid and ClipGrid, both of which are children of the default LayoutRoot. ClipGrid is actually a copy of MainGrid, I just renamed it after copy-pasting. Both Grid controls have Image controls that have the same image.
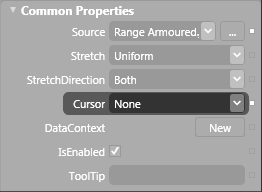
NB: The Cursor property of ClipImage is set to None.
The Code
We have three global variables,
    Private ClipRctGeo As New RectangleGeometry()
    Private ClipPath As New Path()
    Private ScaleTr As New ScaleTransform()
In the MainWindow Initialized event handler we set the properties of these objects,
    Private Sub MainWindow_Initialized(ByVal sender As Object, _
                                       ByVal e As System.EventArgs) Handles Me.Initialized
        ' Set the position and dimensions of
        ' the clipping rectangle that defines
        ' the magnification region.
        ClipRctGeo.Rect = New Rect(0, 0, 80, 80)

        ClipPath.Stroke = Brushes.Gainsboro
        ClipPath.StrokeThickness = 2
        ClipPath.Data = ClipRctGeo

        ClipGrid.Children.Add(ClipPath)
        ClipGrid.Clip = ClipRctGeo

        ' Set magnification to 150%.
        ScaleTr.ScaleX = 1.5
        ScaleTr.ScaleY = 1.5

        ClipGrid.RenderTransform = ScaleTr
        ClipGrid.Visibility = Windows.Visibility.Hidden
    End Sub
ClipPath defines the border/stroke color of the RectangleGeometry, ClipRctGeo. I honestly don't know what gainsboro is but it works well on both light and dark backgrounds. Notice that we're clipping the Grid control, ClipGrid.
The following is what we do when MainGrid's MouseEnter event is fired (remember that ClipGrid, which is stacked above MainGrid in LayoutRoot, has been clipped during MainWindow's Initialized event and its Visibility property set to Hidden.),
    Private Sub MainGrid_MouseEnter(ByVal sender As Object, _
                                    ByVal e As System.Windows.Input.MouseEventArgs) _
                                    Handles MainGrid.MouseEnter
        ' Set magnifying location.
        MoveMagnifier(e)

        If ClipGrid.Visibility = Windows.Visibility.Hidden Then
            ClipGrid.Visibility = Windows.Visibility.Visible
        End If
    End Sub
The MoveMagnifier method does the following,
    Private Sub MoveMagnifier(ByVal e As System.Windows.Input.MouseEventArgs)
        Dim mouseX As Double = e.GetPosition(ClipGrid).X
        Dim mouseY As Double = e.GetPosition(ClipGrid).Y

        ScaleTr.CenterX = mouseX
        ScaleTr.CenterY = mouseY

        ' Set the location and dimensions of the
        ' clipping rectangle.
        ClipRctGeo.Rect = New Rect((mouseX - 40), (mouseY - 40), 80, 80)
    End Sub
In the method above we set the center points of the ScaleTransform object so that 'magnification' occurs from the location of the mouse pointer, which isn't visible since we set the Cursor property of ClipImage to None. I'm sure by now you have figured out that by scaling ClipGrid we create the illusion that the image of interest is being magnified.
The magnification region moves when ClipGrid's MouseMove event handler is called,
    Private Sub ClipGrid_MouseMove(ByVal sender As Object, _
                                   ByVal e As System.Windows.Input.MouseEventArgs) _
                                   Handles ClipGrid.MouseMove
        ' Move magnifying region.
        MoveMagnifier(e)
    End Sub
This is what happens when you move the mouse pointer beyond the magnifiable region,
    Private Sub ClipGrid_MouseLeave(ByVal sender As Object, _
                                    ByVal e As System.Windows.Input.MouseEventArgs) _
                                    Handles ClipGrid.MouseLeave
        ' Hide the canvas when the pointer is beyond
        ' the region of interest.
        ClipGrid.Visibility = Windows.Visibility.Hidden
    End Sub
Image isn't Everything
Since we're actually 'magnifying' a layout container, which is a Grid control in this case, it means that we're not limited to creating a magnification effect on images alone. The following image shows the apparent magnification of a RichTextBox control,

You can download the demo related to the screenshot above from here.
The Magnifier Control
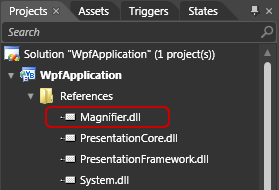
As I explained in the Introduction section, the Magnifier control functions as an Image control with a magnification region. To use the Magnifier control, add a reference to Magnifier.dll that is available from the download link above. The dll should be listed in the References folder of your project,
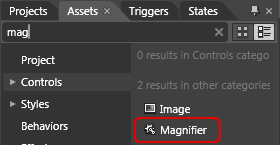
Activate the Assets panel and start typing the word 'magnifier' in the Search text box. You should see the Magnifier control displayed when you type the first few letters,
Double click on the Magnifier control to add it to your layout container or select it and just drag it out. In the Miscellaneous section of the Properties panel look for the ImagesSource property and click on the ellipses button to choose an image from wherever the image you desire is located.

The Code
The code for the Magnifier control is similar to the code I explained earlier with the addition of a DependencyProperty,
Class Magnifier
    Private ClipRctGeo As New RectangleGeometry()
    Private ClipPath As New Path()
    Private ScaleTr As New ScaleTransform()

    Public Sub New()
        MyBase.New()

        Me.InitializeComponent()

        ' Insert code required on object creation below this point.
    End Sub

    Private Sub MagnifierControl_Initialized(ByVal sender As Object, _
                                             ByVal e As System.EventArgs) _
                                             Handles Me.Initialized
        ClipRctGeo.Rect = New Rect(0, 0, 80, 80)

        ClipPath.Stroke = Brushes.Gainsboro
        ClipPath.StrokeThickness = 2
        ClipPath.Data = ClipRctGeo

        ClipGrid.Children.Add(ClipPath)
        ClipGrid.Clip = ClipRctGeo

        ' Set magnification to 150%.
        ScaleTr.ScaleX = 1.5
        ScaleTr.ScaleY = 1.5

        ClipGrid.RenderTransform = ScaleTr
        ClipGrid.Visibility = Windows.Visibility.Hidden
    End Sub

    Private Sub MoveMagnifier(ByVal e As System.Windows.Input.MouseEventArgs)
        Dim mouseX As Double = e.GetPosition(ClipGrid).X
        Dim mouseY As Double = e.GetPosition(ClipGrid).Y

        ScaleTr.CenterX = mouseX
        ScaleTr.CenterY = mouseY

        ' Set the location and dimensions of the
        ' clipping rectangle.
        ClipRctGeo.Rect = New Rect((mouseX - 40), (mouseY - 40), 80, 80)
    End Sub

    Private Sub ClipGrid_MouseLeave(ByVal sender As Object, _
                                ByVal e As System.Windows.Input.MouseEventArgs) _
                                Handles ClipGrid.MouseLeave
        ' Hide the canvas when the pointer is beyond
        ' the region of interest.
        ClipGrid.Visibility = Windows.Visibility.Hidden
    End Sub

    Private Sub ClipGrid_MouseMove(ByVal sender As Object, _
                                   ByVal e As System.Windows.Input.MouseEventArgs) _
                                   Handles ClipGrid.MouseMove
        ' Move magnifying region.
        MoveMagnifier(e)
    End Sub

    Private Sub MainGrid_MouseEnter(ByVal sender As Object, _
                                    ByVal e As System.Windows.Input.MouseEventArgs) _
                                    Handles MainGrid.MouseEnter
        ' Set magnifying location.
        MoveMagnifier(e)

        If ClipGrid.Visibility = Windows.Visibility.Hidden Then
            ClipGrid.Visibility = Windows.Visibility.Visible
        End If
    End Sub

    Public Property ImagesSource() As ImageSource
        Get
            Return CType(GetValue(ImagesSourceProperty), ImageSource)
        End Get
        Set(ByVal value As ImageSource)
            SetValue(ImagesSourceProperty, value)
        End Set
    End Property

    Public Shared ImagesSourceProperty As DependencyProperty = _
        DependencyProperty.Register("ImagesSource", _
                                    GetType(ImageSource), _
                                    GetType(Magnifier), _
                                    New FrameworkPropertyMetadata( _
                                    New PropertyChangedCallback(AddressOf ChangeSource)))

    Private Shared Sub ChangeSource(ByVal source As DependencyObject, _
                                    ByVal e As DependencyPropertyChangedEventArgs)
        CType(source, Magnifier).MainImage.Source = CType(e.NewValue, ImageSource)
        CType(source, Magnifier).ClipImage.Source = CType(e.NewValue, ImageSource)
    End Sub

End Class
Conclusion
Thanks for taking the time to read this article. I hope that it was useful and you picked up something that may eventually crop up in your future applications. Cheers!
History
- 8th Feb, 2011: Initial post
- 9th Feb, 2011: Added UserControl
 "
"