How to invoke Java web service in ASP.net using C#
Contents:
- Background
- Web Services Interoperability
- Create a Java Web Service
- Create ASP.net Web Site Using C#
- Conclusion
Background:
According to W3C: A Web Service is a software system designed to support interoperable machine-to-machine interaction over a network:
- It has an interface described in a machine-processable format (specifically WSDL).
- Other systems interact with the web service in a manner prescribed by its description using SOAP messages, typically conveyed using HTTP with an XML serialization in conjunction with other Web standards.
- Web services operate over any network (the Internet or a private Intranet) to achieve specific tasks.
- The tasks performed by a web service are methods or functions that other applications can invoke and use.
- Web service requests/responses can be sent/received between different applications on different computers belonging to different businesses.
- A mechanism to find and register interest in a service
- A definition of the service’s input and output parameters
- A transport mechanism to access a service
Web Services Interoperability:
Much of the promise of web services is its potential for seamless interoperability across heterogeneous systems, platforms, applications, and programming languages. Interoperability is a primary goal of web services. However, it is not a given. Web services standards facilitate interoperability, but do not ensure it. Many considerations and issues need to be resolved to achieve full interoperability. As the number of specifications expands to address gaps, so do the interoperability challenges.
A web service has many potential clients, and this array of clients can use a variety of libraries and providers to connect. Services can, in turn, become clients of other services. Ensuring that clients based on different implementations of the standards can interoperate with the service is critical to the service's success.
The primary goal of this article is to demonstrate how to create Java web service and invoke it from ASP.net (C#) application.
Here we shall develop simple mathematical functions like addition, subtraction etc. using Java web services called JSimpCalcWebService. Later we shall demonstrate how to invoke these web service methods through ASP.net with C# called JSimpCalcWebServiceWebSite.To create there two separate applications we need to use two IDEs. Here in this example we use NetBeans 6 for Java web service and Visual Studio 2008 for the ASP.net web service client which invokes the web service.
Create a Java Web Service:
Netbeans 6 provides vary easy and convenient way to develop web service. There are a few steps involved in developing a web service using it. These steps can be summarized as follows:
- Create a web application project.
- Add web service to the project.
- Add operations to the web service.
- Implementing the web methodes.
- Deploy and test the web service.
Step 1. Create a web application project
- Start the Netbeans IDE; go to the New Project which is available under File menu. The New Project wizard opens.
- Select the web from categories options and web application from project section and then press the next button.
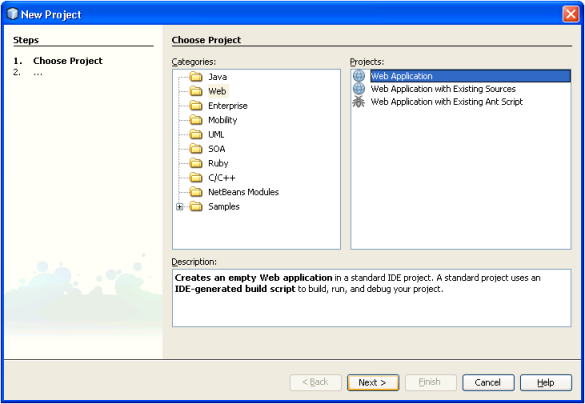
Figure One: Create New Project Step 1 - On the next screen mention the project name, select the project location. We can also mention the server name in which we want to deploy our web application as well we can change the default context path.
Here we mention the project name
JSimpCalcWebServiceand keep the context path same as project name. We use GlassFish V2 application server for deployment.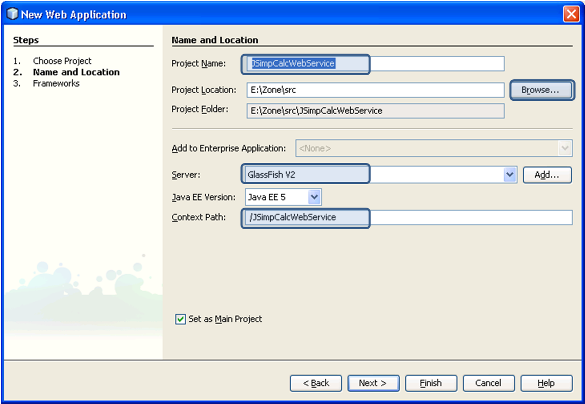
Figure Two: Create New Project Step 2 - Now, click the finish button.
Step 2. Add web service to the project
- Right click on the project name in the Projects explorer window.
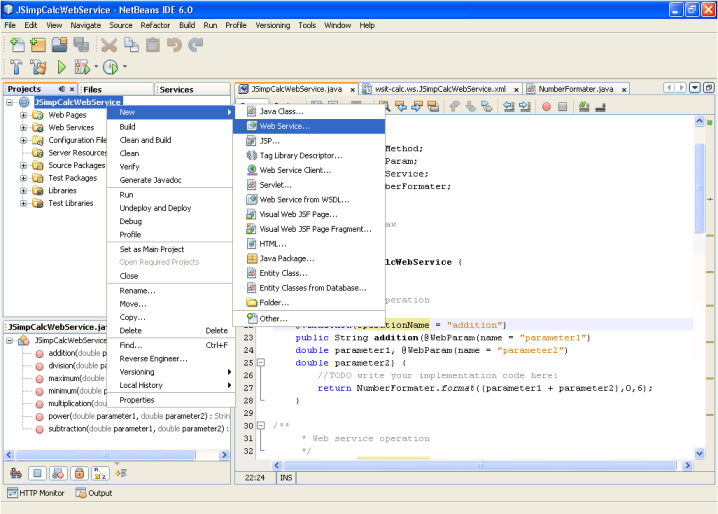
Figure Three: Web Service Menu Option - From the context menu options select the Web Service menu. A web service dialog opens.
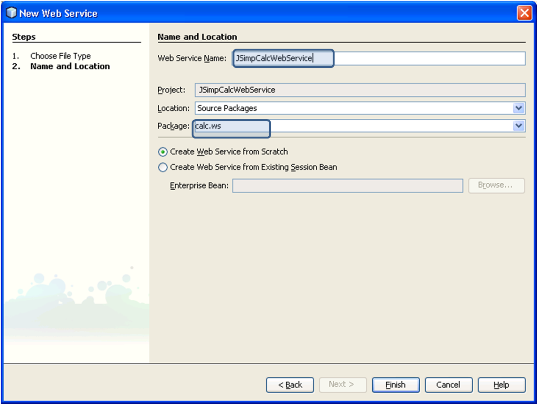
Figure Four: Add New Web Service - Mention the web service name and the package name as mentioned in the image below, and then click the finish button.
In our example the web service name is
JSimpCalcWebServiceand the package name iscalc.ws.
Step 3. Add operations to the web service
After we add web service to our application, now it's time to add web service operation or WebMethod. We can do it in two possible ways one is through design mode and anather is through source mode. In our example we use design mode for creating skeleton of WebMethod in easiest way.
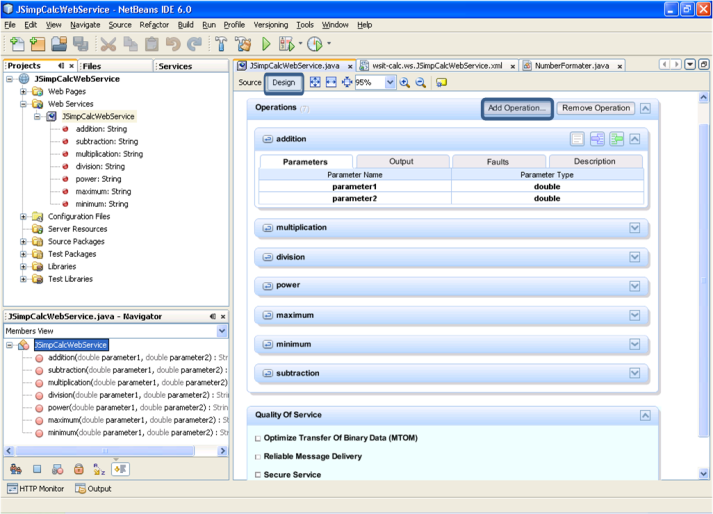
Figure Five: Add Operation To Web Service
- As we can see from highlighted section in the figure five we can add web service operations by clicking Add Operation button. It opens a Add Operation dialog box. Please refer to figure six.
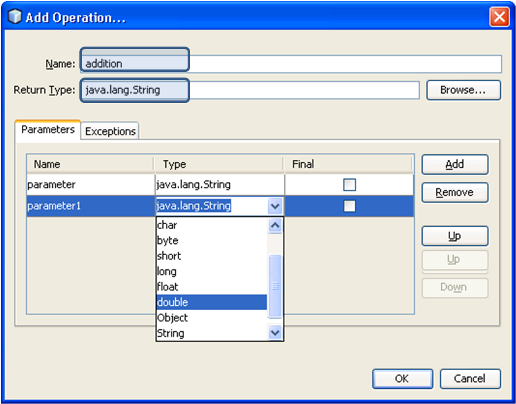
Figure Six: Add Parameters To Web Operation - In the Add Operation dialog we must mention name (which is actually a
WebMethodname). - We can also enter parameter names and their types (these parameter are known as
WebParam).In the figure six we mention the
WebMethodname asadditionwhose return type isjava.lang.Stringand it takes two parameters (parameter1. andparameter2) of typedouble. Similarly we create other operations as well likesubtraction,multiplication,division,power,maximum,minimum.
Step 4: Implementing the web methodes
Once we finish step three, a basic structure of our web service should be ready. Then we switch from design mode to source mode as shown in figure seven to do rest of the implementation.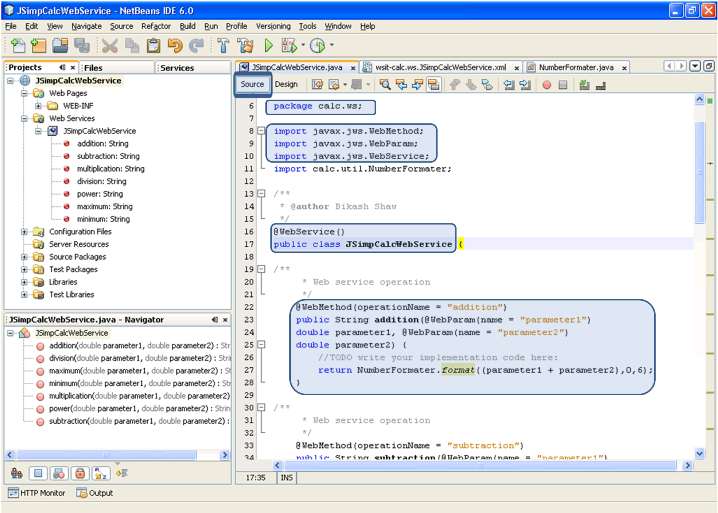
Figure Seven: Write The Code For The Web Service
The code should look like as follows:
package calc.ws;

import javax.jws.WebMethod;
import javax.jws.WebParam;
import javax.jws.WebService;
import calc.util.NumberFormater;

/**
 * @author Bikash Shaw
 */
@WebService()
public class JSimpCalcWebService {

/**
     * Web service operation
     */
    @WebMethod(operationName = "addition")
    public String addition(@WebParam(name = "parameter1")
    double parameter1, @WebParam(name = "parameter2")
    double parameter2) {
        //TODO write your implementation code here:
        return NumberFormater.format((parameter1 + parameter2),0,6);
    }

/**
     * Web service operation
     */
    @WebMethod(operationName = "subtraction")
    public String subtraction(@WebParam(name = "parameter1")
    double parameter1, @WebParam(name = "parameter2")
    double parameter2) {
        //TODO write your implementation code here:
        return NumberFormater.format((parameter1 - parameter2),0,6);
    }

/**
     * Web service operation
     */
    @WebMethod(operationName = "multiplication")
    public String multiplication(@WebParam(name = "parameter1")
    double parameter1, @WebParam(name = "parameter2")
    double parameter2) {
        //TODO write your implementation code here:
        return NumberFormater.format((parameter1 * parameter2),0,6);
    }

/**
     * Web service operation
     */
    @WebMethod(operationName = "division")
    public String division(@WebParam(name = "parameter1")
    double parameter1, @WebParam(name = "parameter2")
    double parameter2) {
        //TODO write your implementation code here:
        return NumberFormater.format((parameter1 / parameter2),0,6);
    }

/**
     * Web service operation
     */
    @WebMethod(operationName = "power")
    public String power(@WebParam(name = "parameter1")
    double parameter1, @WebParam(name = "parameter2")
    double parameter2) {
        //TODO write your implementation code here:
        return NumberFormater.format(Math.pow(parameter1, parameter2),0,6);
    }

/**
     * Web service operation
     */
    @WebMethod(operationName = "maximum")
    public String maximum(@WebParam(name = "parameter1")
    double parameter1, @WebParam(name = "parameter2")
    double parameter2) {
        //TODO write your implementation code here:
        return NumberFormater.format(Math.max(parameter1, parameter2),0,6);
    }

/**
     * Web service operation
     */
    @WebMethod(operationName = "minimum")
    public String minimum(@WebParam(name = "parameter1")
    double parameter1, @WebParam(name = "parameter2")
    double parameter2) {
        //TODO write your implementation code here:
        return NumberFormater.format(Math.min(parameter1, parameter2),0,6);
    }
}
Source One: Java JSimpCalcWebService.java Web Service Source Code
Here we use NumberFormater.format(double number, int minFractionDigits, method to format the
int maxFractionDigits)double value to java.lang.String up to six decimal point. Refer to the source two.
package calc.util;

import java.text.NumberFormat;

/**
 * @author Bikash Shaw
 */
public class NumberFormater {

    public static String format(double number, int minFractionDigits,
            int maxFractionDigits) {
        NumberFormat format = NumberFormat.getInstance();
        format.setMaximumFractionDigits(maxFractionDigits);
        format.setMinimumFractionDigits(minFractionDigits);
        return format.format(number);
    }
}
Source Two: NumberFormater.java Source Code
Step 5. Deploy and test the web service
Now our web service is ready deployment and test. With Netbeans 6 it can achieved very with few steps. First make sure that the GlassFish server is running. To start the server we need to perform the following steps.
- Go to Services explorer window.
- Expand the Servers node.
- Right click on the server name (in our case its GlassFish V2). A context menu pops up.
- Select Start from the menu options.
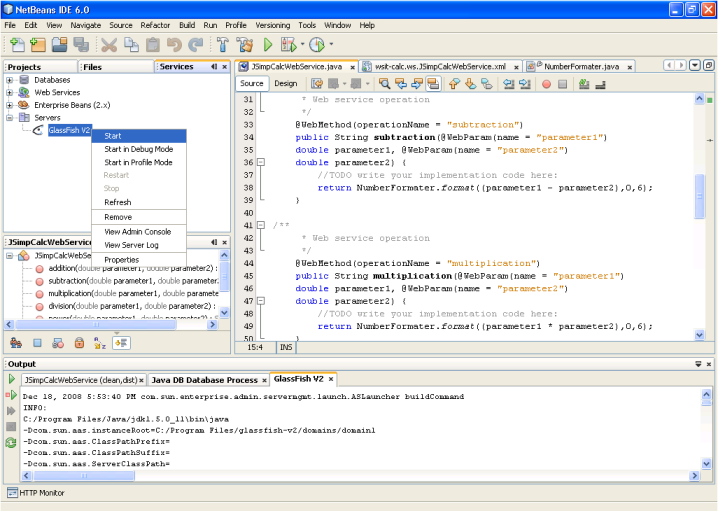
Figure Eight: Start GlassFish V2 Application Server
Now, as our server is running it's time to deploy the application and test the web service that we have developed. Netbeans does the deployment for us with few mouse clicks, mentioned as follows:
- Go to Projects explorer window.
- Expand the Web Services node.
- Right click on the web services name (in our case its
JSimpCalcWebService). A context menu pops up. - Click the Test Web Service menu.
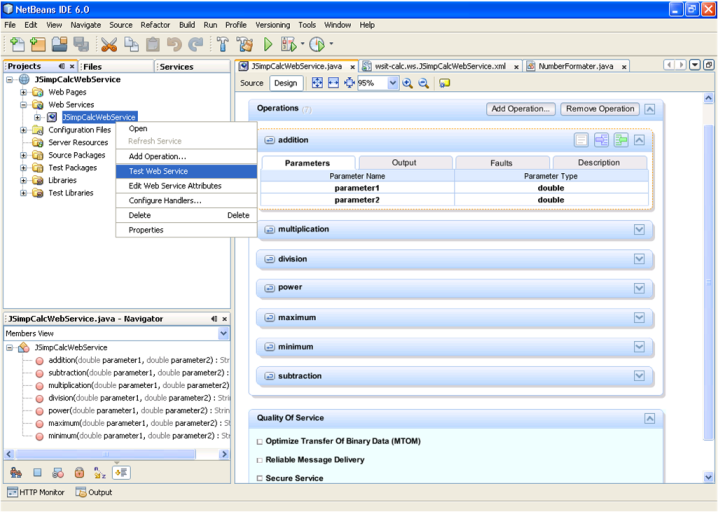
Figure Nine: Test Web Service
The above mentioned steps deploy the application and lunch the default browser in which the web service can be tested via SOAP request and response. Please refer to the figure ten for sample output. We can also view the WSDL (Web Services Description Language) file by clicking on the hyperlink.
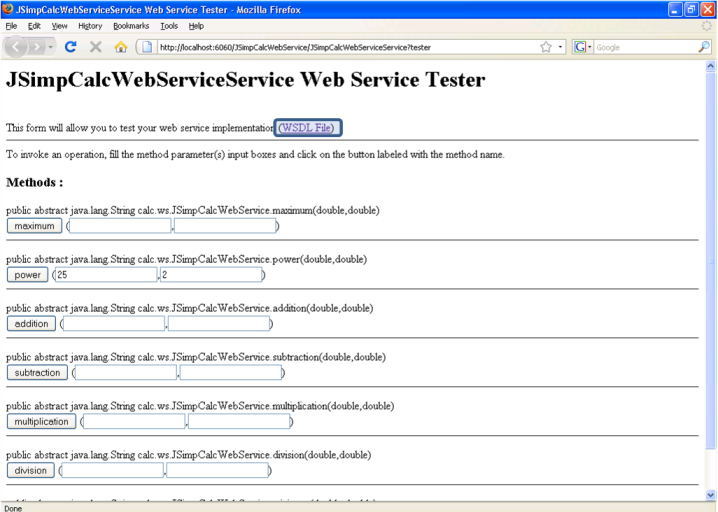
Figure Ten: Test Web Service
Alternatively we can test the web service and view its WSDL document through our GlassFish application server’s admin consol as shown in figure eleven.
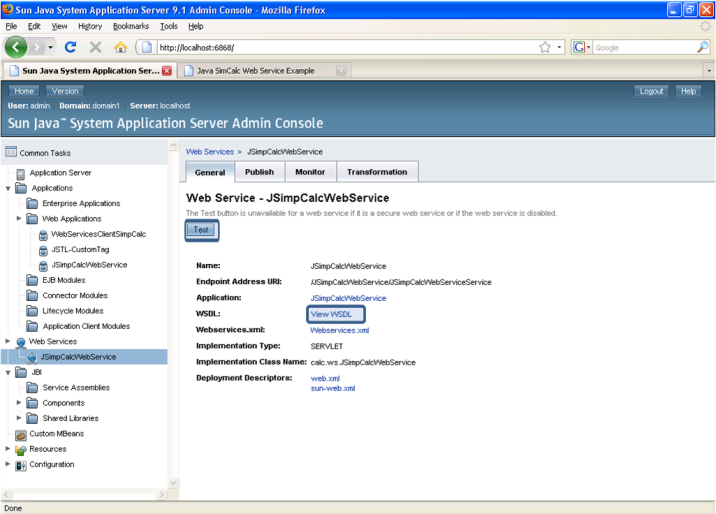
Figure Eleven: Test Web Service via Admin Consol
Once we click on the View WSDL link we can view a XML file for describing our web service. The WSDL file should look like the figure twelve.
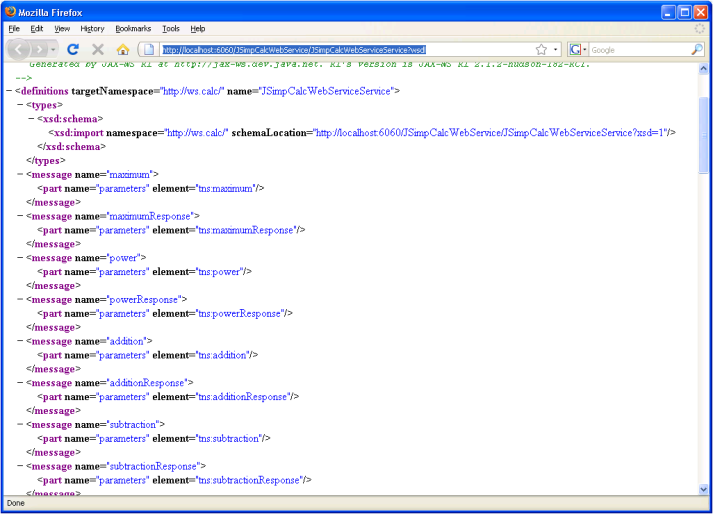
Figure Twelve: WSDL File
The URL shown at the address bar will require invoking the web service. We shall demonstrate its usage during creating of our web application using ASP.net.
Create ASP.net Web Site Using C#:
Now, our web service is ready to get invoked from non Java based development platform. In this article we develop a sample ASP.net based client. Using Visual Studio 2008 it can be achieved in few steps, which can be summarized as follows:
- Create ASP.net web site.
- Add web reference.
- Write code to invoke web service.
- Test web service client application.
Step 1. Create ASP.net web site
- Start Visual Studio 2008; go to the New → Web Site… which is available under File menu.
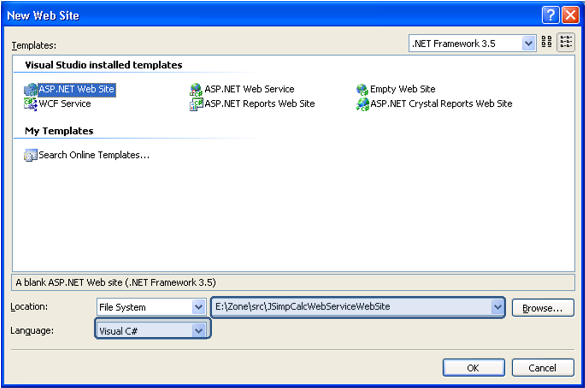
Figure Thirteen: New Web Site Window - Select ASP.net Web Site.
- Select the folder in which we want to create the web site. In our case it’s
JSimpCalcWebServiceWebSite - Select the language Visual C# and click OK button.
Step 2. Add web reference
Now we need to mention the WSDL file in our web site. To add the web service reference we must perform the following steps:
- Go to Solution Explorer window.
- Right click on the project name (in our case its
JSimpCalcWebServiceWebSite). A context menu pops up. - Click the Add Web Reference menu. The Add Web Reference dialog opens.
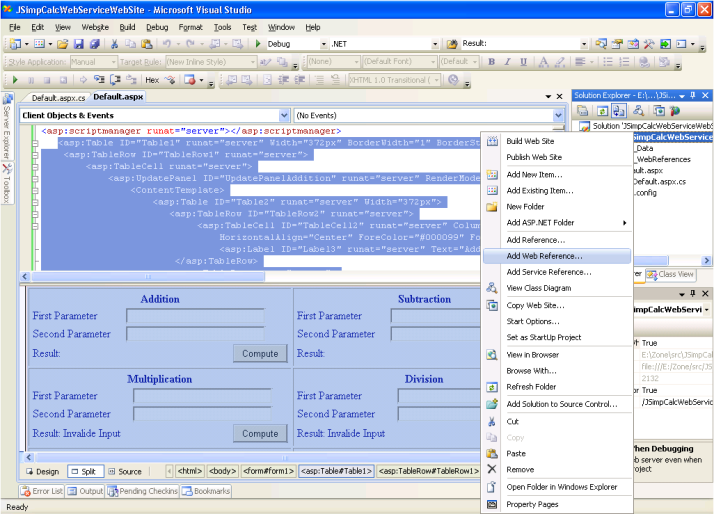
Figure Fourteen: Add Web Reference Context Menu - Copy and paste the WSDL URL from our web brower’s address bar (refer to figure twelve) to Add Web Reference dialog’s address bar and press go button (refer to figure fifteen).

Figure Fifteen: Add Web Reference Dialog - We can see all the methods names of our web service. Give a name to the web reference (in this example its
JSimpCalcWebService) and click the Add Reference button.
Step 3. Write code to invoke web service
Using C# we can very easily invoke the web service with few lines of code:
- We first design an ASP.net page. The default fie name is Default.aspx (the source is available in zip file).
- Induce the web reference in to our code (i.e. Default.aspx.cs). For example:
using JSimpCalcWebServiceService; - Next, create the object of the web reference.
JSimpCalcWebServiceService.JSimpCalcWebServiceService proxy = new JSimpCalcWebServiceService.JSimpCalcWebServiceService(); - Now, we can access the
WebMethodlike any other method call. For example:proxy.addition(10,20);

Figure Sixteen: Web Methods Invocation Code
using System;
using System.Configuration;
using System.Data;
using System.Linq;
using System.Web;
using System.Web.Security;
using System.Web.UI;
using System.Web.UI.HtmlControls;
using System.Web.UI.WebControls;
using System.Web.UI.WebControls.WebParts;
using System.Xml.Linq;
using JSimpCalcWebServiceService;

public partial class _Default : System.Web.UI.Page
{
    JSimpCalcWebServiceService.JSimpCalcWebServiceService proxy;

    protected void Page_Load(object sender, EventArgs e)
    {
        proxy = new JSimpCalcWebServiceService.JSimpCalcWebServiceService();
    }

    protected void btnAddition_Click(object sender, EventArgs e)
    {
        try
        {
            lblResultAddition.Text = "Result: " + proxy.addition(double.Parse(txtbtnAdditionParameter1.Text),
								double.Parse(txtbtnAdditionParameter2.Text));
        }
        catch (FormatException)
        {
            lblResultAddition.Text = "Result: Invalide Input";
        }
        UpdatePanelAddition.Update();
    }

    protected void btnSubtraction_Click(object sender, EventArgs e)
    {
        try
        {
            lblResultSubtraction.Text = "Result: " + proxy.subtraction(double.Parse(txtSubtractionParameter1.Text),
									double.Parse(txtSubtractionParameter2.Text));
        }
        catch(FormatException)
        {
            lblResultSubtraction.Text = "Result: Invalide Input";
        }

        UpdatePanelSubtraction.Update();
    }
    protected void btnMultiplication_Click(object sender, EventArgs e)
    {
        try
        {
            lblResultMultiplication.Text = "Result: " + proxy.multiplication(double.Parse(txtMultiplicationParameter1.Text),
									double.Parse(txtMultiplicationParameter2.Text));
        }
        catch (FormatException)
        {
            lblResultMultiplication.Text = "Result: Invalide Input";
        }

        UpdatePanelMultiplication.Update();
    }

    protected void btnDivision_Click(object sender, EventArgs e)
    {
        try
        {
            lblResultDivision.Text = "Result: " + proxy.division(double.Parse(txtDivisionParameter1.Text),
								double.Parse(txtDivisionParameter2.Text));
        }
        catch (FormatException)
        {
            lblResultDivision.Text = "Result: Invalide Input";
        }

        UpdatePanelDivision.Update();
    }

    protected void btnMaximum_Click(object sender, EventArgs e)
    {
        try
        {
            lblResultMaxMin.Text = "Result: " + proxy.maximum(double.Parse(txtMaxMinParameter1.Text),
							double.Parse(txtMaxMinParameter2.Text));
        }
        catch (FormatException)
        {
            lblResultMaxMin.Text = "Result: Invalide Input";
        }

        UpdatePanelMaxMin.Update();
    }

    protected void btnMinimum_Click(object sender, EventArgs e)
    {
        try
        {
            lblResultMaxMin.Text = "Result: " + proxy.minimum(double.Parse(txtMaxMinParameter1.Text),
								double.Parse(txtMaxMinParameter2.Text));
        }
        catch (FormatException)
        {
            lblResultMaxMin.Text = "Result: Invalide Input";
        }

        UpdatePanelMaxMin.Update();
    }

    protected void btnPower_Click(object sender, EventArgs e)
    {
        try
        {
            lblResultPower.Text = "Result: " + proxy.power(double.Parse(txtPowerParameter1.Text),
							double.Parse(txtPowerParameter2.Text));
        }
        catch (FormatException)
        {
            lblResultPower.Text = "Result: Invalide Input";
        }

        UpdatePanelPower.Update();
    }
}
Source Three: Default.aspx.cs Source Code
Step 4. Test web service client application
Now, it's time to test our web service client application by clicking on the Start Debugging toolbar button or by pressing F5 key. The web page should look like the figure below.
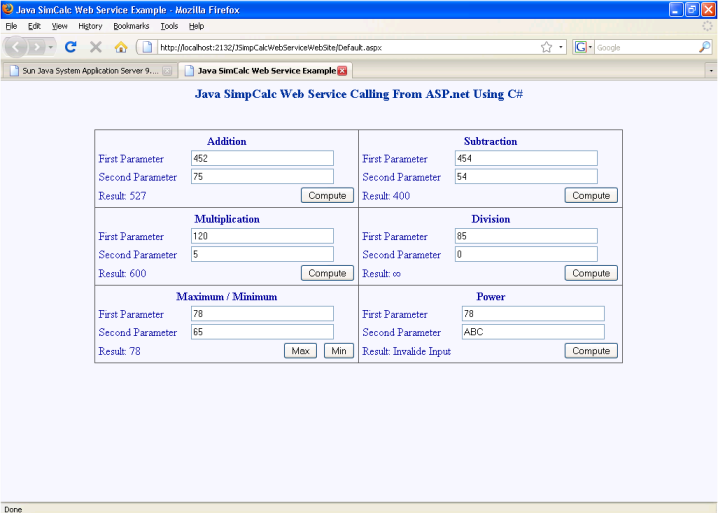
Figure Seventeen : Web Site Output
Conclusion:
This article tried to demonstrate standards used by web services with little concern for the underlying implementation mechanism. The example shown here exploits a number of properties of web services mentioned below:
- Self-Contained: No additional software is required for web service:
- Client-Side: A programming language with XML/HTML client support.
- Server-Side: A web server and a SOAP server are needed.
- Loosely Coupled: Client and server only knows about messages - a simple coordination level that allows for more flexible re-configuration.
- Web-Enabled: Web Service are published, located and invoked across the web, using established lightweight Internet standards.
- Language-Independent and Interoperable: Client and server may be implemented in different environments and different languages.
- Composable: Web service can be aggregated using workflow techniques to perform higher-level business functions.
- Dynamically Bound: With UDDI and WSDL, the discovery and binding of web services can be automated.
- Programmatic Access: The web services approach does not provide a graphical user interface but operates at the command level.
- Wrap Existing Applications: Stand-alone applications can easily be integrated by implementing a web service as an interface.
 "
"发表评论
 Royal CBD[89.28.10.*]2020/9/29 3:16:34#2
T9Hj02 If some one wants to be updated with hottest technologies afterward he must be
Your site is very interesting, i have bookmarked it.