Custom Membership Providers
Introduction
Authentication is an integral part of every web application. A number of ways exists to provider authentication support to your websites. But, i personally found that asp.net's authentication model is good for this purpose. ASP.Net supports number of authentication models suvh as forms, windows, passport etc. Using one of this methods is surprisingly simple. This article concentrates on implementing forms authentication for an asp.net mvc application. the MembershipProvider class acts as the basis for this article. So, initially, i will be shortly explaining how to use the built-in membership provider. After that, i will go in to details of how to implement a custom membership provider. at the end of this article i will make sure that you have a fully working application that implements authorization
Background - Using the Default MembershipProvider
Using the default membership provider that comes with asp.net is simple and straightfoward. To get started with default membership providers, just create an ASP.Net MVC 2 Web Application (or 3, if installed) application. Remember not to choose the ASP.Net MVC 2 Empty Web Application. After this step, you now have an asp.net mvc 2 application that has the basic requirements like forms authentication, few views and related controllers. As this article is about membership providers, I am not going to elaborate on the folder structure or about the mvc architecture in general.
Main emphasis lies on the following files - AccountController.cs and web.config. Following is a section of the web.config file that requires our attention. We instruct the asp.net server to use forms authentication using the <authentication /> element. Mode is an attribute that indicates the type and possible values include forms, windows, passport and none. This article is about forms authentication and so the mode is set to be "forms" and the <forms /> element indicates the login url and the timeout. This article concentrates only in the membership part. in future i am planning to extend this to include roles, profiles etc. So those parts are not shown in the web.config file. Thus, the <membership /> element indicates that the default membership provider is being used. An important attribute in the <add /> element is the connectionStringName attribute. That points to the database connection string that will hold the membership information. AS this is a default application, i have let it to use the default connection string, which the aspnetdb.mdf database. This mdf file will be created the first time you run your sample application.
<connectionStrings>
    <add name="ApplicationServices"
         connectionString="data source=.\SQLEXPRESS;Integrated Security=SSPI;
                  AttachDBFilename=|DataDirectory|aspnetdb.mdf;User Instance=true"
         providerName="System.Data.SqlClient" />
</connectionStrings>

<authentication mode="Forms">
  <forms loginUrl="~/Account/LogOn" timeout="2880" />
</authentication>

<membership>
  <providers>
    <clear/>
    <add name="AspNetSqlMembershipProvider"
        type="System.Web.Security.SqlMembershipProvider"
        connectionStringName="ApplicationServices"
        enablePasswordRetrieval="false"
        enablePasswordReset="true"
        requiresQuestionAndAnswer="false"
        requiresUniqueEmail="false"
        maxInvalidPasswordAttempts="5"
        minRequiredPasswordLength="6"
        minRequiredNonalphanumericCharacters="0"
        passwordAttemptWindow="10"
        applicationName="/" />
  </providers>
</membership>
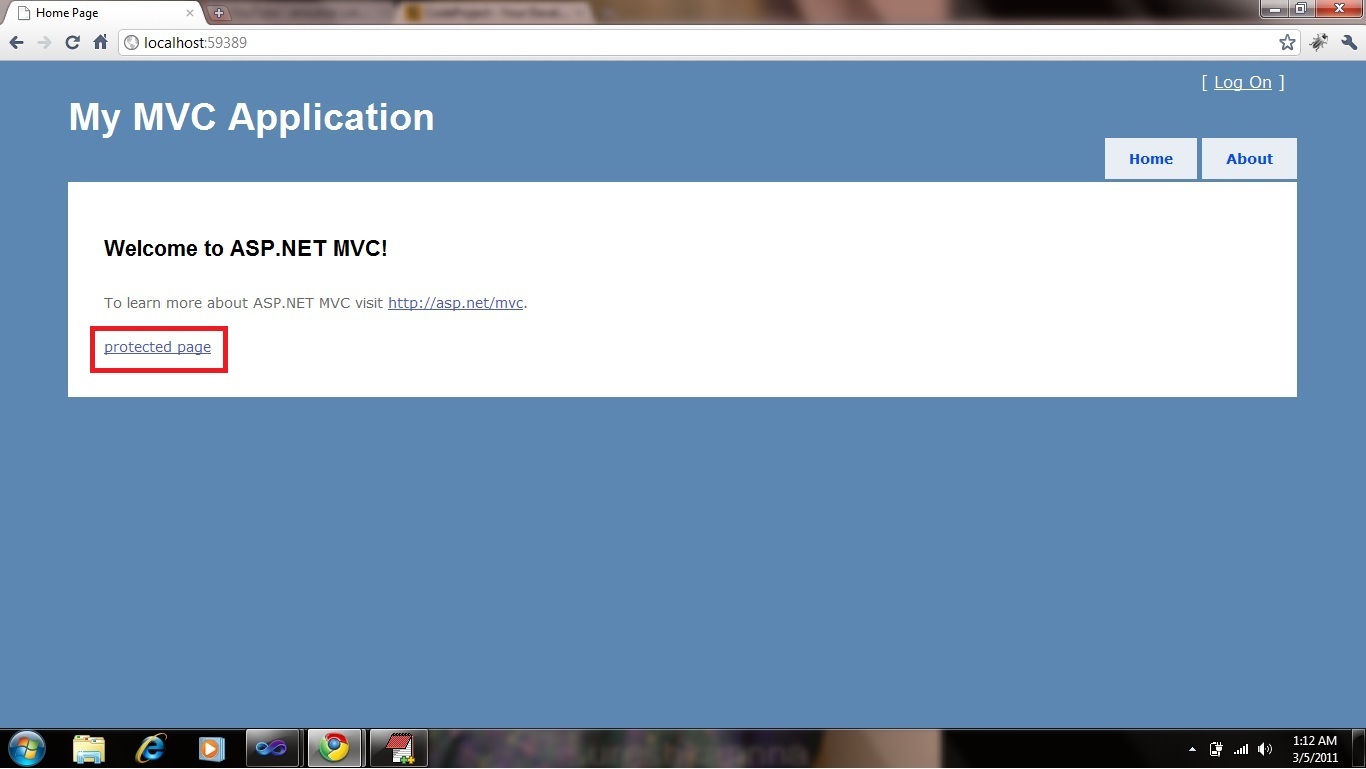
Without further ado, if you run the application you will be able to see the home page with a link for logging in as shown in the image below. Clicking on it will take you to the login page. A register link is present in the login page, which allows you to register with your choice of a user name and a password. Simple, isn't it? Now if you navigate to the App_Db folder, you will be able to notice that the aspnetdb.mdf file has been created. As you have used the default membership provider, asp.net uses its own table structure with tables like aspnet_Users, aspnet_Membership etc., which contains the membership information. Now you have a working version of a mvc web site with authentication. But it does not end there. Let us now see how to implement a custom membership provider instead of using the default membership provider.
Custom Membership Providers
From this point, you will see a lot of code instead of just descriptions. in case you have questions, please do not hesitate to ask them in the comments section below. To the left of this article, you have a section that lists the downloads associated to this article. Listed there is a link to download the entire project that implements a custom memebership provider. i will use that as a reference, so that it is easier for you to follow.
The first step in implementing a custom membnership provider is to create a class that extends the MembershipProvider class. This class has a long set of methods. At this point, the emphasis is on 3 methods and 2 properties - one to validate a user, one to find a user by username and one to register a new user and the properties to return the minimum password length and whether duplicate email is allowed. To get started create a new asp.net mvc 2 project (not an empty project) and name it CustomMembershipProvider. then in your Models folder, create a class called CustomMembershipProvider. This class will be extending the abstract MembershipProvider class. Given below is the CustomMembershipProvider provider class, with only the 3 methods we require being listed. MembershipProvider is included in the System.Web.Security and so you may have to add a reference to that namespace.
Hint: To add all the methods to be implemented, place your cursor at the begining (or end) of the word MembershipProvider, press Ctrl + . and then choose Implement abstract class 'MembershipProvider'
public class CustomMembershipProvider : MembershipProvider
{
    public override MembershipUser CreateUser(string username,
       string password, string email, string passwordQuestion,
       string passwordAnswer, bool isApproved,
       object providerUserKey, out MembershipCreateStatus status)
    {
        throw new NotImplementedException();
    }

    public override MembershipUser GetUser(string username, bool userIsOnline)
    {
        throw new NotImplementedException();
    }

    public override bool ValidateUser(string username, string password)
    {
        throw new NotImplementedException();
    }

    public override int MinRequiredPasswordLength
    {
        get { throw new NotImplementedException(); }
    }

    public override bool RequiresUniqueEmail
    {
        get { throw new NotImplementedException(); }
    }
}
Let us get to the implementation part later. Now open the web.config file and change the value in the connectionString attribute under the <add /> element within the <connectionStrings /> element to point to your database. then leave the <authentication /> element as is and replace the default <membership /> element with the ones given below. the following web.config assumes that you have named the project as CustomMembershipProvider and added the CustomMembershipProvider.cs file to the Models folder.
Points of Interest
<connectionStrings>
    <add name="ApplicationServices"
      connectionString="Server=your_server;Database=your_db;
                         Uid=your_user_name;Pwd=your_password;"
      providerName="System.Data.SqlClient" />
</connectionStrings>

<authentication mode="Forms">
  <forms loginUrl="~/Account/LogOn" timeout="2880" />
</authentication>

<membership defaultProvider="CustomMembershipProvider">
  <providers>
    <clear/>
    <add name="CustomMembershipProvider"
        type="CustomMembership.Models.CustomMembershipProvider"
        connectionStringName="AppDb"
        enablePasswordRetrieval="false"
        enablePasswordReset="true"
        requiresQuestionAndAnswer="false"
        requiresUniqueEmail="false"
        maxInvalidPasswordAttempts="5"
        minRequiredPasswordLength="6"
        minRequiredNonalphanumericCharacters="0"
        passwordAttemptWindow="10"
        applicationName="/" />
  </providers>
If you notice, you will be able to see a few differences. One, in the
CREATE TABLE [dbo].[Users](
    [UserID] [int] IDENTITY(1,1) NOT NULL,
    [UserName] [varchar](50) NOT NULL,
    [Password] [varchar](50) NOT NULL,
    [UserEmailAddress] [varchar](50) NOT NULL,
 CONSTRAINT [PK_Users] PRIMARY KEY CLUSTERED
(
    [UserID] ASC
)WITH (PAD_INDEX  = OFF, STATISTICS_NORECOMPUTE  = OFF,
    IGNORE_DUP_KEY = OFF, ALLOW_ROW_LOCKS  = ON, ALLOW_PAGE_LOCKS  = ON) ON [PRIMARY]
) ON [PRIMARY]
Now we need to create a class that will represent this table for us to operate on. Code listing below represents that class. I guess the code is self-explanatory. But, still, some details won't hurt. the Table attribute indicates that this class represents a table with the name "Users". Every column in the table above is present in the class and is decorated with the Column attribute. UserID, if you notice in the table definition has been set to auto increment. This has been specified using IsDbGenerated for the UserID column.
[Table(Name="Users")]
public class UserObj
{
    [Column(IsPrimaryKey=true, IsDbGenerated = true, AutoSync=AutoSync.OnInsert)]
    public int UserID { get; set; }
    [Column] public string UserName { get; set; }
    [Column] public string Password { get; set; }
    [Column] public string UserEmailAddress { get; set; }
}
Managing Creation/Validation of Users
The next step would be to create a user repository that would do the actual creation/validation of users. This class is listed below. the CustomMembershipProvider uses this repository to validate (GetUserObjByUsername) and create users(RegisterUser).
public class User
{
    private Table<UserObj> usersTable;
    private DataContext context;

    public User()
    {
        string connectionString =
          ConfigurationManager.ConnectionStrings["AppDb"].ConnectionString;
        context = new DataContext(connectionString);
        usersTable = context.GetTable<UserObj>();
    }

    public UserObj GetUserObjByUserName(string userName, string passWord)
    {
        UserObj user = usersTable.SingleOrDefault(
          u => u.UserName == userName && u.Password == passWord);
        return user;
    }

    public UserObj GetUserObjByUserName(string userName)
    {
        UserObj user = usersTable.SingleOrDefault(u => u.UserName == userName);
        return user;
    }

    public IEnumerable<UserObj> GetAllUsers()
    {
        return usersTable.AsEnumerable();
    }

    public int RegisterUser(UserObj userObj)
    {
        UserObj user = new UserObj();
        user.UserName = userObj.UserName;
        user.Password = userObj.Password;
        user.UserEmailAddress = userObj.UserEmailAddress;

        usersTable.InsertOnSubmit(user);
        context.SubmitChanges();

        return user.UserID;
    }
}
Now that we have the repository that does the actual work, lets get back to the CustomMembershipProvider class. An important point to note is that, the class that uses this CustomMembershipProvider is already available for you in the Models folder - AccountModels.cs file. if you notice that file, you will be able to find these lines:
public class AccountMembershipService : IMembershipService
{
    private readonly MembershipProvider _provider;

    -- cut for brevity --
}
If you could recollect, in the web.config we have already defined the CustomMembershipProvider to be the defaultProvider. So the linkage between the AccountMembershipService and CustomMembershipProvider has already been set. So once you complete the required methods in the CustomMembershipProvider class, you will be all set to go! Now, given below is a version of CustomMembershipProvider class that has the methods left unimplemented before implemented.
public class CustomMembershipProvider : MembershipProvider
{
    public override MembershipUser CreateUser(string username, string password,
           string email, string passwordQuestion, string passwordAnswer,
           bool isApproved, object providerUserKey, out MembershipCreateStatus status)
    {
        ValidatePasswordEventArgs args =
           new ValidatePasswordEventArgs(username, password, true);
        OnValidatingPassword(args);

        if (args.Cancel)
        {
            status = MembershipCreateStatus.InvalidPassword;
            return null;
        }

        if (RequiresUniqueEmail && GetUserNameByEmail(email) != string.Empty)
        {
            status = MembershipCreateStatus.DuplicateEmail;
            return null;
        }

        MembershipUser user = GetUser(username, true);

        if (user == null)
        {
            UserObj userObj = new UserObj();
            userObj.UserName = username;
            userObj.Password = GetSHA1Hash(password);
            userObj.UserEmailAddress = email;

            User userRep = new User();
            userRep.RegisterUser(userObj);

            status = MembershipCreateStatus.Success;

            return GetUser(username, true);
        }
        else
        {
            status = MembershipCreateStatus.DuplicateUserName;
        }

        return null;
    }
    public override MembershipUser GetUser(string username, bool userIsOnline)
    {
        User userRep = new User();
        UserObj user = userRep.GetAllUsers().SingleOrDefault(u => u.UserName == username);
        if (user != null)
        {
            MembershipUser memUser = new MembershipUser("CustomMembershipProvider",
                                           username, user.UserID, user.UserEmailAddress,
                                           string.Empty, string.Empty,
                                           true, false, DateTime.MinValue,
                                           DateTime.MinValue,
                                           DateTime.MinValue,
                                           DateTime.Now, DateTime.Now);
            return memUser;
        }
        return null;
    }

    public override bool ValidateUser(string username, string password)
    {
        string sha1Pswd = GetMD5Hash(password);
        User user = new User();
        UserObj userObj = user.GetUserObjByUserName(username, sha1Pswd);
        if (userObj != null)
            return true;
        return false;
    }

    public override int MinRequiredPasswordLength
    {
        get { return 6; }
    }

    public override bool RequiresUniqueEmail
    {
        // In a real application, you will essentially have to return true
        // and implement the GetUserNameByEmail method to identify duplicates
        get { return false; }
    }

    public static string GetMD5Hash(string value)
    {
        MD5 md5Hasher = MD5.Create();
        byte[] data = md5Hasher.ComputeHash(Encoding.Default.GetBytes(value));
        StringBuilder sBuilder = new StringBuilder();
        for (int i = 0; i < data.Length; i++)
        {
            sBuilder.Append(data[i].ToString("x2"));
        }
        return sBuilder.ToString();
    }
}
If you notice, at the minimum we just require 3 methods and 2 properties to be implemented - ValidateUser, CreateUser, GetUser and the properties MinRequiredPasswordLength, RequiresUniqueEmail. GetMD5Hash is the method that is used to calculate the MD5 hash of the password entered by the user. MD5 is NOT a safe algorithm and so i recommend you to use another hashing (/ encryption) algorithm to save passwords. Never, never ever store passwords as clear text! Also, you will be able to notice that we are using the user repository created in the previous steps.
Final Steps
Now that we have come this far, first navigate to the register link, register and then go back to the login screen and login. If you are successfully able to login, you have completed 75% of what you intended! But, if you notice, you will be to visit every page in the "Views" section regardless of you were authenticated or not. Don't worry, authentication is working. But you need to add another attribute that stops this behavior. Lets do this in 2 steps. Before that log out from the application. Firstly, open the HomeController.cs file in the Controllers folder and add the code below:
public ActionResult Protected()
{
    return View();
}
Now right-click inside the Protected method and choose "Add View...". This will add a View called Protected.aspx in the Views/Home folder. Add the following to this file.
<%@ Page Title="" Language="C#"
  MasterPageFile="~/Views/Shared/Site.Master"
  Inherits="System.Web.Mvc.ViewPage<dynamic>" %>

<asp:Content ID="Content1"
         ContentPlaceHolderID="TitleContent" runat="server">
	Protected
</asp:Content>

<asp:Content ID="Content2"
  ContentPlaceHolderID="MainContent" runat="server">

    <h2>Protected</h2>

    This is a protected page!

</asp:Content>
Then in the Home.aspx page in the Views/Home folder, add the following:
<%= Html.ActionLink("protected page","Protected") %>
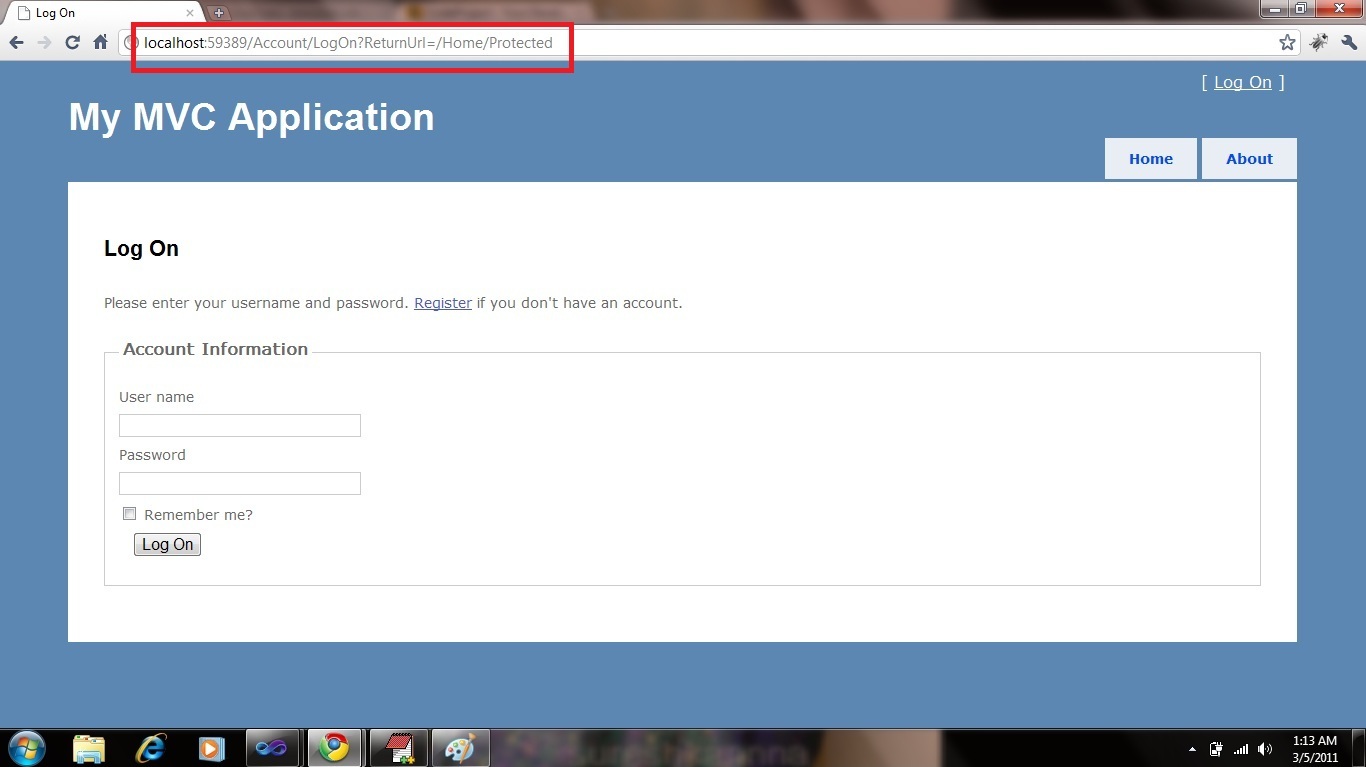
Build the application and run it. Go the home page and you should be able to see the protected page link. If you click on it, you will be able to see the page even when you are not authenticated! So here is the key to really protect this page. Use the Authorize attribute to "actually" use the feature that we built.
Given below is the updated code:
[Authorize]
public ActionResult Protected()
{
    return View();
}
Now, build the application. If you try to refresh your page, you will be taken to the login page. If you notice the URL, you will see a query parameter called returnUrl that is set to /Home/Protected. So when you login, you will be redirected to the protected page. This is the point at which you have really implemented (and used) custom authentication!

Please feel free to let me know your comments in the "Comments and Discussions" section below.
History
First version of the article published
 "
"