Integrate Microsoft Dynamics Axapta with Temperature Conversion C# Application - Part II
Introduction
To understand this article one have to go through the Part-I. This will be useful for those ISVs or clients who would like to send the data back to Axapta after processing from third party application. As earlier stated in Part – I, when temperature will be converted than the temperature data can be send back to Axapta by using C# application. My main intention to develop and publish these articles to help the ISvs and clients for having POC about the integration of their existing applications with Axapta.
In order to understand the advantage of this article please read the following scenario:
We have the data in Axapta which needs to operate by some processes. Client or ISV is already having the third party application which has all desired functionalities to process the data. This kind of integration I had published in Part I of this article. Now there s greater extent of requirement to again update the Axapta with process data from third party application. This functionality is beautifully demonstrated with the help of Temperature conversion application.
To demonstrate this POC I had modified the same application which I developed in my Part I.
To understand this POC one should be proficient regarding Object oriented concepts for C# and Axapta He should be having extensive working experience in Axapta and C#.
Here I will not only give the source code but also the description about the code that I added to Part I .
Let’s begin this interesting journey…
Background
To developed the Axapta connector, one should be having extensive knowledge of X++ and C#. This means that one should be having working knowledge of object oriented programming.
To understand this article one should go through the Part-I. In addition to that one should be having Axapta with Sql Server 2005 and Visual Studio 2008 with sp1 installed on their system.
Modification 1: Creation of AxHelper class
This class is containing the code to connect to Axapta from Temperature Conversion application.
using System;

using System.Collections.Generic;

using System.Linq;

using System.Text;

using Microsoft.Dynamics.BusinessConnectorNet;

namespace CvrtC2Frnt

{ Microsoft.Dynamics.BusinessConnectorNet

class AxHelper:BC

{

BC bc = new BC();

Axapta ax;

string tableName = "SalesTable";

AxaptaRecord axRecord;

public void SetAxRec(Boolean Farenhite, double Temp, string SalesId)

{

ax = bc.GetAxConnection();

if (ax != null)

{

using (axRecord = ax.CreateAxaptaRecord(tableName))

{

ax.TTSBegin();

axRecord.ExecuteStmt("select forupdate * from %1 where %1.SalesId ==" + "'" + SalesId + "'" );

axRecord.set_Field(50001, Temp);

if (Farenhite == true)

axRecord.set_Field(50002, 1);

else

axRecord.set_Field(50002, 0);

axRecord.Update();

ax.TTSCommit();

}

}

}

}

}
The above code clearly specifies that we are using Microsoft.Dynamics.BusinessConnectorNet dll to send the data to Axapta.
Modification 2: Creation of BC Class
using System;

using System.Collections.Generic;

using System.Linq;

using System.Text;

using Microsoft.Dynamics.BusinessConnectorNet;

namespace CvrtC2Frnt

{

class BC

{

Axapta ax;

AxaptaRecord axRecord;

public Axapta GetAxConnection()

{

ax = new Axapta();

ax.Logon(null, null, null, null);

return ax;

}

}

}
The above helps to connect to Axapta
Modification 3: Modify ConverTemp Class
namespace CvrtC2Frnt

{

public class ConvertTemp

{

public static double sourceTemp=0, destTemp=0;

public static bool Faren = false;

public static string SalesId = string.Empty;

public static double ConvertCelsiusToFahrenheit(double c)

{

destTemp = 0;

destTemp = ((9.0 / 5.0) * c) + 32;

return ((9.0 / 5.0) * c) + 32;

}

public static double ConvertFahrenheitToCelsius(double f)

{

destTemp = 0;

destTemp = (5.0 / 9.0) * (f - 32);

return (5.0 / 9.0) * (f - 32);

}

public void ShowResult( double Temperature,bool Farenhite, string salesId)

{

ShowTemperature sT = new ShowTemperature(Temperature, Farenhite, salesId);

sT.Show();

}

}

}
In the above code, SalesID is added so that we can modify the SalesTable in Axapta for the converted temperature.
Modification 4: Modify Convert Button
private void btnConvert_Click(object sender, EventArgs e)

{

AxHelper axhlp = new AxHelper();

if (ConvertTemp.Faren == true)

{

txtDestTmp.Text = Convert.ToString(ConvertTemp.ConvertFahrenheitToCelsius(double.Parse(txtSourceTmp.Text)));

axhlp.SetAxRec(false, ConvertTemp.ConvertFahrenheitToCelsius(double.Parse(txtSourceTmp.Text)),ConvertTemp.SalesId);

}

if (ConvertTemp.Faren == false)

{

txtDestTmp.Text = Convert.ToString(ConvertTemp.ConvertCelsiusToFahrenheit(double.Parse(txtSourceTmp.Text)));

axhlp.SetAxRec(true, ConvertTemp.ConvertCelsiusToFahrenheit(double.Parse(txtSourceTmp.Text)), ConvertTemp.SalesId);

}

}
In the above code ConvertCelsiusToFahrenheit is now taking three parmeters to update the SalesTable after converting temperature.
Modification 5: Modify ShowTemperature Constructor
public ShowTemperature(double Temperature, Boolean Fahrenheit, string SalesId)

{

InitializeComponent();

txtSourceTmp.Text = Temperature.ToString();

ConvertTemp.Faren = Fahrenheit;

ConvertTemp.sourceTemp = Temperature;

ConvertTemp.SalesId = SalesId;

}
In the above code SalesID is now also initializing with value from Axapta so that we can update the SalesTable with the converted temperature by C# application.
Modification 6: Modify the ConvertTemperature Class in Axapta
void ConvertTemperature(real Temperature, Boolean Fahrenheit, str SalesId)

{

ct = new CvrtC2Frnt.ConvertTemp();

ct.ShowResult(Temperature, Fahrenheit, SalesId);

}
In the above SalesID is added as a third parameter.
Modification 7: Modify the Clicked Function for ConvertTemperature Botton on SalesTable in Axapta
void clicked()

{

Temperature tem = new Temperature();

;

tem.ConvertTemperature( element.salesTable().Temperature, element.salesTable().Farenhite, element.salesTable().SalesId);

super();

}
Now finally let’s have a demo…
Demo 1:
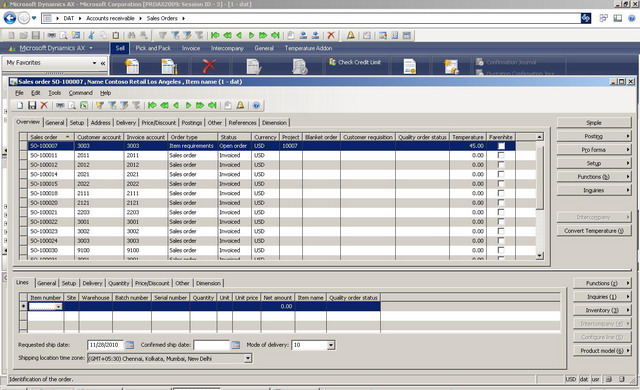
On the above SalesTable Axapta form, key in the Temperature as 45 and uncheck Fahrenheit. This means that Temperature is 45 degree Celsius. Click on Convert Temperature button on the above form.
Click on Convert button on Convert Temperature C# form.
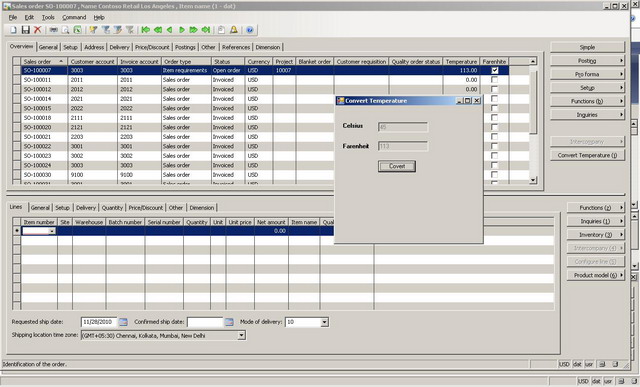
On the above Sales Order form in Axapta, Temperature is converted to Fahrenheit.
This is it!
In this article not only temperature is converted but also posted to Axapta SalesOrder.
I have another surprise in this article. Upto now, I had integrated ConvertTemperature Application with SalesOrder Card form but now in Demo 2, one can see how easily we can integrate it to SalesListPage of Axapta.
Let us start …
Demo 2:
On the above SalesOrderList page, one can see the Temperature Add-on tab on Action page. Two command button one can see i.e.
a) Refresh – To refresh the SalesOrderList page.
Convert Temperature- This will populate the same Convert Temperature form from c# as it was coming from SalesCard form.
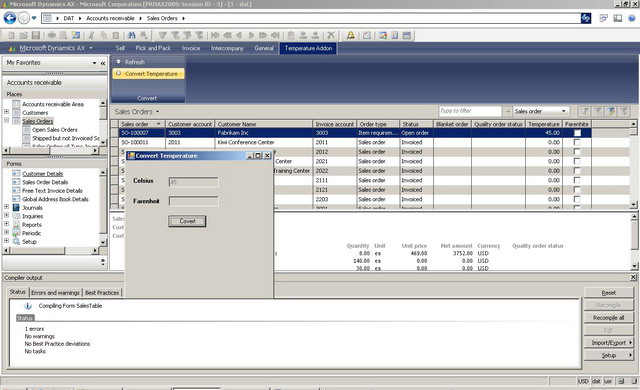
On the above form, click on Covert button to convert the 45 degree Celsius to Fahrenheit.

We can see that 45 degree Celsius is converted to 113 Fahrenheit. The converted temperature is also updated in SalesList Page. To see that click on refresh button on SalesList Page.
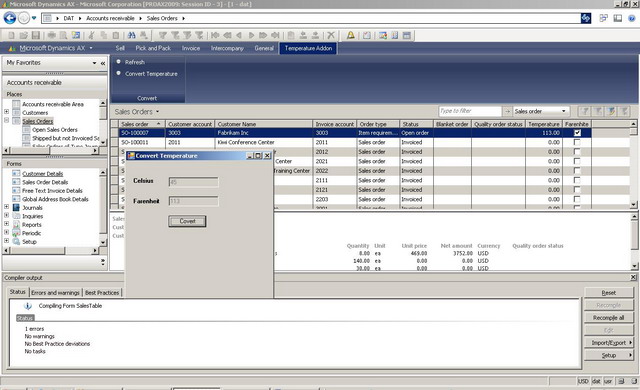
You got the converted temperature in Axapta SalesList page too via c#.
I am providing complete C# code and Axapta code so that any ISV, client and developers can understand that how we can use the UI and logic of any third party application in c# with Axapta records to process it and again posting back to Axapta. Big and small organization always looks for this kind of two way integration to save time and effort for implementing new functionalities in ERP. Instead of implementing new functionality in ERP, we can integrate the third party application to ERP for achieving the desired functionality.
Please note that this Temperature conversion application can also easily be integrated with MS Dynamics Navision by writing only 8 lines of code. This means that developers should have working knowledge of C# and Axapta. They should also follow the best practices prescribed by Product owner. In our case it is Microsoft. As I had worked in lot of integrations project for Axapta and Navision for Various ISV's, developers should know the ERP very well technically. If the ERP is Axapta than one should know the Object oriented concepts and at least 2 years of Axapta experience with at least 1 year of C# experience. C# is important as without the C# experience, developers who only know Navision or Axapta will be 95% idle. Now a days integrating Axapta and Navision is becoming very easy, matter of 8 hours only with any other application. We should give full credit to Microsoft as they had exposed the business logic and code of Axapta and Navision through web service. So folks Happy coding but very carefully as you going to play with the financiall data which is very crucial to any Client...
 "
"